2017 China New Design melamine coffee mug to Nigeria Factories
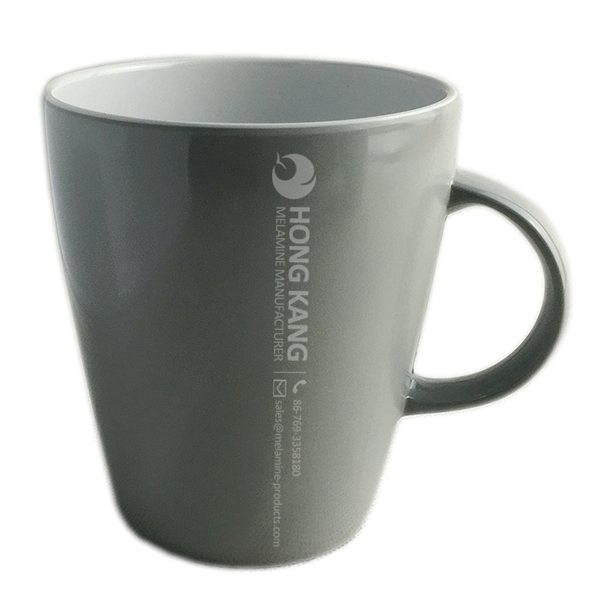
2017 China New Design melamine coffee mug to Nigeria Factories Detail:
| Specification | |
| Item Name | 400ml Melamine Coffee Mug |
| Item No. | CP093 |
| Shape | Round with handle |
| Body Color | Grey/White |
| Decal Color | 4 colors print (if need) |
| Finish | Glossy |
| Style | Fashion |
| Motif Design | Customized |
| Shape Design | OEM/ODM |
| Test Standard | FDA,PROP 65,EN71,LFGB etc. by SGS or ITS |
| Packaging | 80pcs/carton |
| Dimensions | |
| Length | 8.7 cm |
| Width | 11.5 cm |
| Height | 10 cm |
| Capacity | 400 ml |
| Material | |
| Body Material | 100%melamine |
| Decal Material (if need) | 4 colors print (CMYK), or spot color printing, RoHS certificate |
| Imprint (if need) | Seiko ink type 1000 or other type, RoHS certificate |
| Accessories Information | |
| Lid included | No |
| Other | No |
| Weights | |
| Net Weight (kg) | 9 |
| Shipping Weight (kg) | 10.3 |
Product detail pictures:
Related Product Guide:
Top Ten Power Toothbrushes
The Benefits Of Using Silicone Kitchen Utensils
We are commitment to offer the competitive price ,outstanding products quality, as well as fast delivery for 2017 China New Design melamine coffee mug to Nigeria Factories, The product will supply to all over the world, such as: Bangladesh , Karachi , Canada , We are always creating new technology to streamline the production, and provide goods with competitive prices and high quality! Customer satisfaction is our priority! You can let us know your idea to develop unique design for your own model to prevent too much similar parts in the market! We will offer our best service to satisfy all your needs! Please contact us right away!
FAQ: 1.Q: Where is your factory located? How can I visit there? A: Our factory is located in Guangdong province, China. Warmly welcome to visit us! 2.Q: What is the material of your products? A: The material is melamine. 3.Q: How can I get some samples? A: We can send the samples by Express/DHL/FedEx/UPS etc. 4.Q: How does your company do regarding quality control? A: We have a very strict QC system. Our inspectors have been closely monitoring the production process from the selection of raw materials to the final step of the finished products. 5.Q: Can you print our logo on the product & packing? A: Yes, We can print your logo on our products. 
| * Do Not Touch On Fire Directly | |
|---|---|
| * Do Not Washing By Steelwire Ball | |
| * Non-Microwave Ovens | |
| * Dishwasher Safe |
http://chat.paltalk.com/g2/group/1123520970/DisplayGroupDetails.wmt Global END GAME. Download Paltalk and join this chatroom.
http://www.paltalk.com/
You are welcome to join discussion group Global END GAME at Paltalk.com
Multi-national corporate agribusiness may be poisoning our food by intentionally adding melamine to artificially boost protein content, let’s govern ourselves accordingly.
http://www.sciencedaily.com/releases/2007/12/071203203820.htm
…contaminated substances called melamine, cyanuric acid, ammelide and ammeline were also in the food.
http://www.horsesass.org/?p=2899
BREAKING: Melamine-tainted feed contaminated farmed fish in US and Canada
China-free, DEFINITION chi-na-free adj. A term proposed for use on food labels to show that products are not made in China.
http://www.theinternetpetvet.com/melamine-in-baby-food
…lack of regulation in China’s food industry. DON’T eat ANY food that outsources even one food ingredient from China.
http://www.avma.org/onlnews/javma/jul07/070701d.asp
Melamine adulterates pellet feeds
http://www.huffingtonpost.com/david-goldstein/fda-finds-melamine-in-chi_b_49179.html?view=print
melamine detected in imported Chinese catfish
http://www.news-medical.net/?id=24780
USDA “not necessary to quarantine 20 million chickens or livestock where melamine…makes up only a small share of the feed
http://www.washingtonpost.com/wp-dyn/content/article/2007/05/07/AR2007050701685.html
“There is very low risk to human health” from consuming the chickens… (Producer: at least we’re being told there is a risk)
http://www.dnronline.com/news_details.php?AID=10239&CHID=1
no cause for alarm
http://www.msnbc.msn.com/id/18556690/
Farmed fish have been fed meal spiked with the same chemical that has been linked to the pet food recall, but the contamination was probably too low to harm anyone who ate the fish, federal officials said Tuesday.
http://www.mg.co.za/article/2007-04-30-chinese-petfood-makers-unfazed-over-melamine
Customers either don’t know or aren’t concerned about the practice, said Wang Jianhui, manager of the Kaiyuan Protein Feed company
http://archive.supermarketguru.com/page.cfm/33250
FDA/USDA determined that hogs and chickens that were fed the tainted pet food as part of their feed have already been processed and distributed, and likely already consumed by people.
http://petprojectblog.com/archives/cats/wal-mart-chicken-jerky-tests-positive-for-melamine/
Tests have found melamine in the chicken jerky Wal-Mart
Sales manager is very enthusiastic and professional, gave us a great concessions and product quality is very good,thank you very much!