• Good quality 100% melamine soap dish for Luxembourg Manufacturer

    Product Detail

    Features

    Care Instructions

    Product Tags

    Related Video

    Feedback (2)

    With our excellent management, strong technical capability and strict quality control system, we continue to provide our clients with reliable quality, reasonable prices and excellent services. We aim at becoming one of your most reliable partners and earning your satisfaction for christmas melamine dinnerware , chip and dip plate , Melamine Two Tone Mug , We have a big inventory to fulfill our customer's requires and needs.
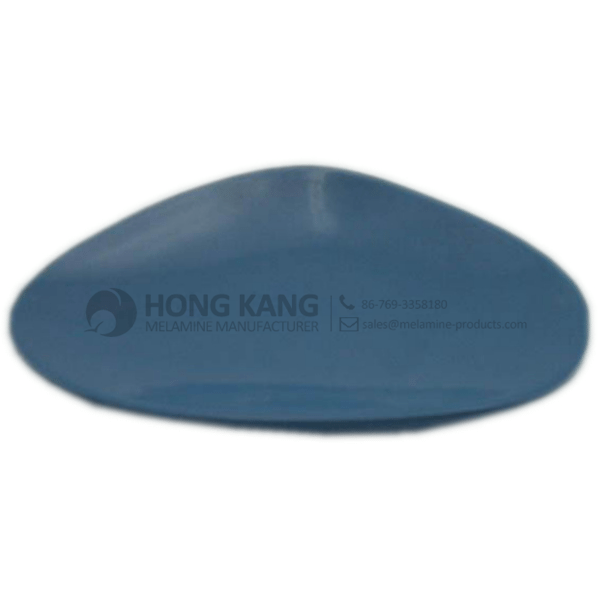
    Good quality 100% melamine soap dish for Luxembourg Manufacturer Detail:

    Specification
    Item Name 5.5inch Triangle Melamine soap dish
    Item No. PT223
    Shape Triangle
    Body Color Blue
    Decal Color 4 colors print (if need)
    Finish Glossy
    Style Fashion
    Motif Design Customized
    Shape Design OEM/ODM
    Test Standard FDA,PROP 65,EN71,LFGB etc. by SGS or ITS
    Packaging 12pcs/box,72pcs/carton
    Dimensions
    Length 14 cm
    Width 10 cm
    Height 1.5 cm
    Capacity N/A
    Material
    Body Material 100%melamine
    Decal Material (if need) 4 colors print (CMYK), or spot color printing, RoHS certificate
    Imprint (if need) Seiko ink type 1000 or other type, RoHS certificate
    Accessories Information
    Lid included No
    Other No
    Weights
    Net Weight (kg) 6.4
    Shipping Weight (kg) 7.5

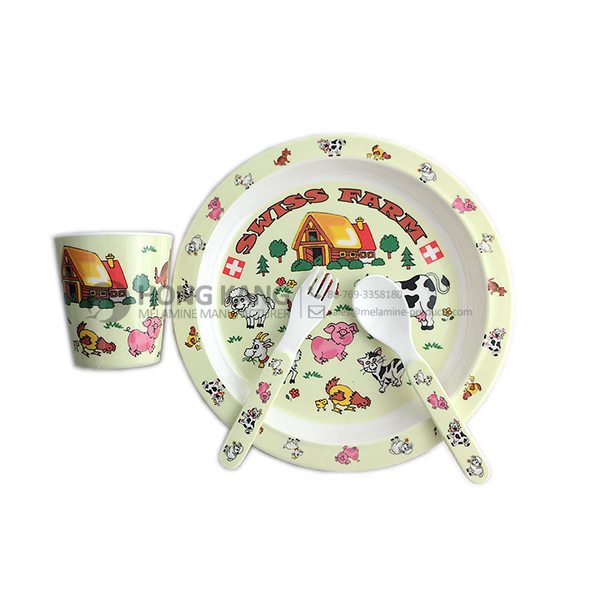
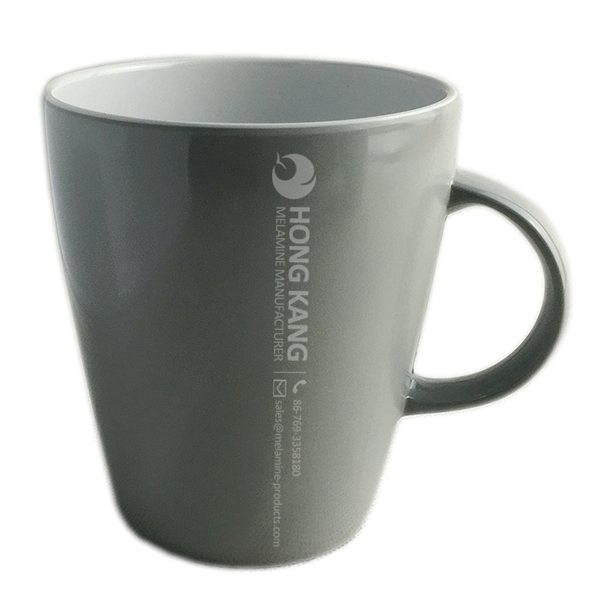
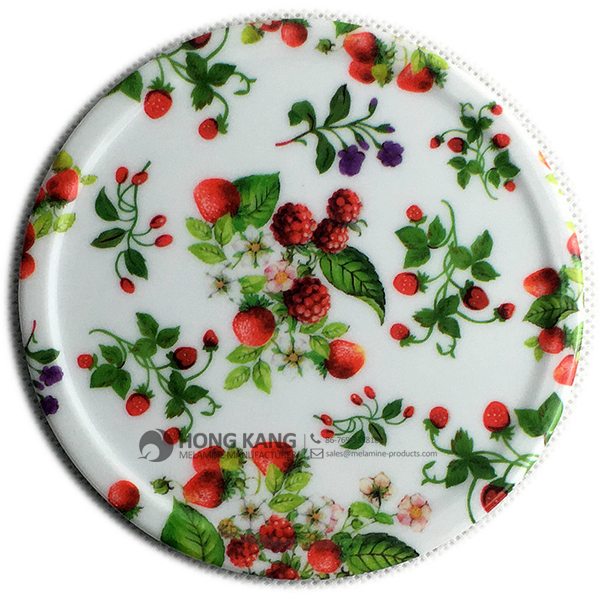
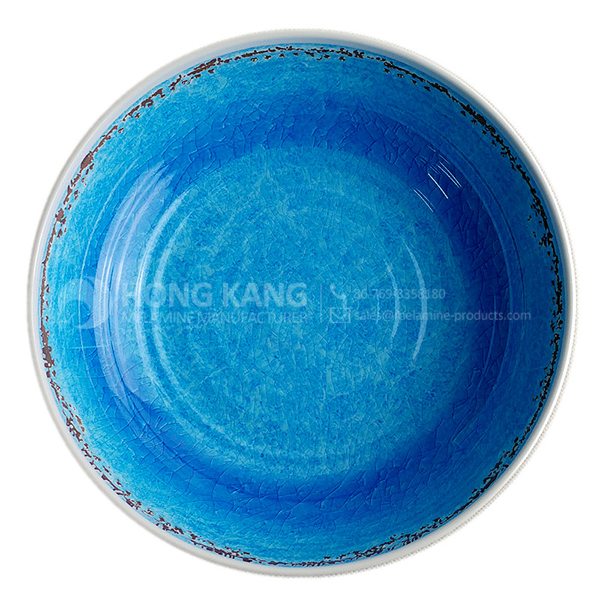
    Product detail pictures:

    Good quality 100%
 melamine soap dish for Luxembourg Manufacturer detail pictures


    Related Product Guide:
    Choosing The Best Dog Bowl and Feeder for Your Dog
    Affordable Types of Dinnerware Sets

    We thinks what customers think, the urgency of urgency to act in the interests of a customer position of principle, allowing for better quality, lower processing costs, prices are more reasonable, won the new and old customers the support and affirmation for Good quality 100% melamine soap dish for Luxembourg Manufacturer, The product will supply to all over the world, such as: Albania , Dominica , French , With the spirit of "high quality is our company's life; good reputation is our root", we sincerely hope to cooperate with customers from at home and abroad and hope to build a good relationship with you.

    FAQ: 1.Q: Where is your factory located? How can I visit there? A: Our factory is located in Guangdong province, China. Warmly welcome to visit us! 2.Q: What is the material of your products? A: The material is melamine.  3.Q: How can I get some samples? A: We can send the samples by Express/DHL/FedEx/UPS etc. 4.Q: How does your company do regarding quality control? A: We have a very strict QC system. Our inspectors have been closely monitoring the production process from the selection of raw materials to the final step of the finished products. 5.Q: Can you print our logo on the product & packing? A: Yes, We can print your logo on our products. Multicolor-Plastic-Dinnerware-Melamine-Dinner-Plate

    * Do Not Touch On Fire Directly
    * Do Not Washing By Steelwire Ball
    * Non-Microwave Ovens
    * Dishwasher Safe


  • This video illustrates the use of accessories with the Big Sport Party Bowl from bigsportgifts.com.

    Nothing is worse than that moment you go for a chip only to hit cold, hard plastic. It’s the bottom of the bowl and it’s something no football fan should have to deal with when their team is playing.

    Enter Big Sport Party Bowl, the sport snacking system designed exclusively for the football fanatic. With an amazing 3.5 gallon capacity, you never have to worry about running out of your favorite snacks. Load it up with one type of chip if that’s your style. Or, throw in the Big Divide to satisfy multiple people’s game day cravings. Plus, as a two-piece collapsible insert, it is easy to wash and store. Add a few Skyboxes for even more snacking options. These high-quality cups clip onto the rim of your Party Bowl and will dish out anything you can take. From salsa to queso, peanuts to olives – GO BIG OR GO HOME!

    Stats:

    7.5 in. height and an impressive 14.5 in. diameter makes it the biggest player in its division
    Made of high-grade melamine to withstand even the dirtiest of tackles
    Full-color, officially licensed wrap around graphics means there is no mistaking your team loyalty


    The complete process of how to build a concrete table without any specialty tools. It’s an affordable way to make high end and beautiful furniture. For the complete tutorial and materials list check out DIYPETE.com. Please note that

    For more info, project photos, and downloadable plans check out:

    http://www.diypete.com/how-to-build-a-concrete-table/

    The buffet table I made is 17″wide by 52″ long by 1.5″ thick. Here is a diagram showing how I made the mold.

    Cut the bottom of the mold out of melamine using a circular saw
    This piece should be the exact width and length you’d like the concrete table to be.

    Cut the strips that will border the bottom piece
    If you want a 1.5″ thick concrete slab, add 3/4″ to the strips so they are 2.25″ tall. This accommodates for the bottom of the mold.

    Assemble the sides of the mold.
    Attach using 1 5/8 inch black drywall screws about every 8-12 inches. Drill a pilot hole to help it go in easier. Make sure to drill in from the side as evenly as possible.

    Complete the mold
    Once assembled, the mold will look like the photo below. You will now have a structure which concrete can be poured in. Note — the actual top of your concrete table will be very smooth because it will cure against the smooth and flat melamine surfaces. The part that you screed and trowel later on will actually be the bottom side. You will flip the mold once the project has cured.

    Caulk the creases in your mold.
    In the video I use a squeeze tube of 100% silicon caulk. You can also use a caulk gun. Then run a caulk tool to smooth it out. You can also use painters tape to get an even caulk line as pictured below.

    Cut Re-enforcement
    Once the caulk has cured, go ahead and cut the re-enforcement to size using a bolt cutter. If your table is 52″ long by 17″ in width, cut the metal wiring to about 50″ by 15″. It will leave about an inch of play on each side. Then use rubbing alcohol and a paper towel to thoroughly clean the mold, making sure all sawdust and particles are out of the mold.

    It’s time to mix up the concrete. Follow the directs on the bag to see how much water they recommend adding. I like to pour some water into the tub prior to the concrete to minimize dust. Wear a dust mask for this process because the particles are not good to breathe. Mix 1 or 2 bags of concrete at a time. To stir up the concrete use a small shovel or garden hoe. I like to mix it to a peanut butter consistency.

    Pack Concrete
    Take a handful of concrete (wearing your rubber gloves of course), and start packing the concrete into the mold. *Don’t forget to make sure your work table is as level as possible prior to packing the concrete.

    Add Re-enforcement
    Once the mold is filled up a little more than half way you’ll want to add the re-enforcement. Simply put the re-enforcement in place and then finish packing the rest of the mold with concrete.

    Fill and screed
    Fill the mold with concrete until it is full. Take an old 2×4 or straight piece of wood and screed off the excess to level out the concrete. Move the 2×4 in a sawing motion. Continue back and forth across the entire mold (multiple times) and fill in any low spots with extra concrete. Check that your work table is still level. You can always shim if needed.

    Remove concrete from the mold
    Remove all the drywall screws. Next, take a chisel and slowly pry the wood side away from the concrete. Make sure not to let the chisel (or flathead screwdriver ) touch the concrete.

    Flip the concrete and remove top of mold
    Slowly flip the concrete. It helps to have two people. I like to take a few shop rags or foam to put under the concrete so when it is flipped vertically there is something for it to rest softly on. Continue flipping the piece and rest it on a few spare boards. Resting it on boards that are evenly spaced will allow the piece to dry thoroughly.

    Sand concrete
    Use an orbital sander to smooth the piece. You will expose a few more bug holes but that is okay. Run the sander on the sides and corners as well. The top edges will be pretty rough. You’ll fill in the rough area with portland cement after this process.

    Apply Sealer
    Use a clean rag and get any remaining dust off the concrete. Next, find a new rag and use it to apply a stone or concrete sealer. These can be found at a local hardware store. Read the instructions to find out the best way to apply the sealer. Once the sealer drys I like to wax the piece.
    —-
    Looking for more DIY videos? Be sure to check out our channel and subscribe for updates! We post a weekly tutorial every Thursday.

    Looking for woodworking, concrete working, and other DIY projects plans to follow? You can download plans for free at http://gumroad.com/DIYPETE

    Facebook: http://facebook.com/DiyProjectsWithPete
    Instagram: http://instagram.com/diypete

    Pete Sveen
    1627 W Main Street Suite 182
    Bozeman, Montana 59715

    This is a reputable company, they have a high level of business management, good quality product and service, every cooperation is assured and delighted!
    5 Stars By Beatrice from Zambia - 2015.09.08 17:09
    The sales manager is very patient, we communicated about three days before we decided to cooperate, finally, we are very satisfied with this cooperation!
    5 Stars By Lauren from Senegal - 2015.10.09 19:07

    Related Products

    WhatsApp Online Chat !