Wholesale Price Melamine serving tray to Belarus Factories
Wholesale Price Melamine serving tray to Belarus Factories Detail:
Specification | |
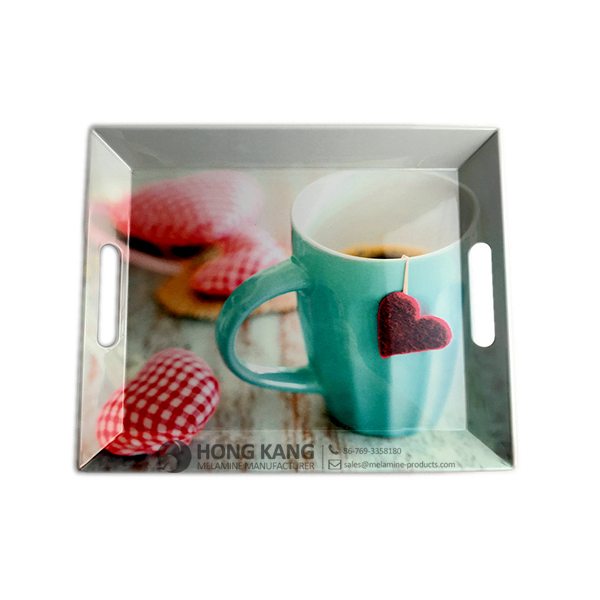
Item Name | 20inch Melamine Rectangle Tray with Handle |
Item No. | TR078 |
Shape | Rectangle |
Body Color | White |
Decal Color | 4 colors print (if need) |
Finish | Glossy |
Style | Fashion |
Motif Design | Customized |
Shape Design | OEM/ODM |
Test Standard | FDA,PROP 65,EN71,LFGB etc. by SGS or ITS |
Packaging | 3pcs/box,6pcs/carton |
Dimensions | |
Length | 50.5 cm |
Width | 37.5 cm |
Height | 4.9 cm |
Capacity | N/A |
Material | |
Body Material | 100%melamine |
Decal Material (if need) | 4 colors print (CMYK), or spot color printing, RoHS certificate |
Imprint (if need) | Seiko ink type 1000 or other type, RoHS certificate |
Accessories Information | |
Lid included | No |
Other | No |
Weights | |
Net Weight (kg) | 6 |
Shipping Weight (kg) | 7 |
Product detail pictures:

Related Product Guide:
Top Ten Power Toothbrushes
Benefits of Melamine Dinnerware
We have a professional, efficiency team to provide quality service for our customer. We always follow the tenet of customer-oriented, details-focused for Wholesale Price Melamine serving tray to Belarus Factories, The product will supply to all over the world, such as: Mexico , Peru , Puerto Rico , We have a large share in global market. Our company has strong economic strength and offers excellent sale service. We have established faith, friendly, harmonious business relationship with customers in different countries. , such as Indonesia, Myanmar, Indi and other Southeast Asian countries and European, African and Latin American countries.
FAQ: 1.Q: Where is your factory located? How can I visit there? A: Our factory is located in Guangdong province, China. Warmly welcome to visit us! 2.Q: What is the material of your products? A: The material is melamine. 3.Q: How can I get some samples? A: We can send the samples by Express/DHL/FedEx/UPS etc. 4.Q: How does your company do regarding quality control? A: We have a very strict QC system. Our inspectors have been closely monitoring the production process from the selection of raw materials to the final step of the finished products. 5.Q: Can you print our logo on the product & packing? A: Yes, We can print your logo on our products.
* Do Not Touch On Fire Directly | |
---|---|
* Do Not Washing By Steelwire Ball | |
* Non-Microwave Ovens | |
* Dishwasher Safe |
Sanyuan, the sole food and beverage supplier for the Beijing Olympics, has been caught producing melamine-contaminated milk.
Chinese authorities (the General Administration of Quality Supervision, Inspection and Quarantine) found the toxin in three batches of Sanyuan’s high-fiber high-calcium milk powders made in late June and early September, according to a report released on September 30.
Melamine was also detected in a batch of Sanyuan’s infant formula produced on September 9.
Before the report, Sanyuan was the only listed dairy producer in China that had avoided being associated with milk contamination.
Earlier testing had cleared Sanyuan products of melamine, causing its share price to surge, but now it’s just one of many companies caught up in the scandal.
Thumbnail photo courtesy: FREDERIC J. BROWN/AFP/Getty Images
(Cartons and packages of milk are placed for display and sale at a grocery store in Beijing on October 15, 2008. China has urgently ordered all dairy products more than a month old to be pulled from shop shelves nationwide in its latest step to end a scandal over contaminated milk, with all dairy products made before September 14 having to be tested for the industrial Beijing that has been responsible for killing four babies and leaving more than 53,000 others sick in September 2008.)
Click here to SUBSCRIBE to the official This Old House YouTube channel: http://www.youtube.com/subscription_center?add_user=thisoldhouse
This Old House general contractor Tom Silva transforms stock shelving into a custom built-in. (See below for a shopping list, tools, and steps.)
Shopping List for Building a Custom Built-In Using Stock Shelving:
- Freestanding shelving units
- 1 1/4-inch decking screws, to fasten cabinets together
- 3-inch drywall screws,”] to attach 2×4 nailer
- Wood shims,”] to plumb the cabinets
- Wood glue
- Construction adhesive
- 1x8s and 1x6s,”] to cut face frame, fascia, and other trim
- 2x4s, to make nailer
- Crown molding
- Acrylic latex paint (semigloss)
Tools List for Building a Custom Built-In Using Stock Shelving:
- Utility knife, to cut through old paint and caulk
- Two flat bars, to pry molding from wall
- Oscillating multitool with plunge-cut wood blade, to cut through baseboard
- Spring clamps
- Impact driver
- Screwdriver
- 4-foot level
- Stud finder, to locate the wall studs
- Pin nailer and 3/4-inch pins, to attach trim
- Finishing nailer and 1 3/4-inch nails, to attach face frame and trim
- Air compressor, to power pin and finishing nailers
- Scriber tool, to scribe the face frame to fit against wall
- Circular saw, to trim scribed face frame parts
- Caulking gun, for construction adhesive, to adhere shelves
- Sash brush
Steps or Building a Custom Built-In Using Stock Shelving:
1. Use a utility knife to slice through the existing paint and caulk along the top and bottom edges of the baseboard.
2. Carefully pry the baseboard from the wall with two flat pry bars.
3. Saw through the baseboard with the oscillating multitool fitted with a plunge-cut wood blade.
4. Clamp and screw together two cabinets using the impact driver and 1 1/4-inch decking screws.
5. Set the extension-shelf units on top of the two cabinets, and secure them with the provided cam-screw fasteners.
6. Measure and mark the stud locations on the wall, then set the cabinet assembly against the wall.
7. Insert wood shims under the front of the cabinet and check for plumb with the 4-foot level.
8. Fasten the cabinet bydriving screws through the cabinet back and into the wall studs. Repeat to install the other cabinet.
9. Glue and nail 1/8-inch-thick pine filler strips (ripped from your 1x stock) to the upper edge of the cabinet. Secure the strips with glue and the pin nailer equipped with 3/4-inch pins.
10. Screw a 2×4 nailer to the ceiling directly above the cabinets.
11. Cut a fascia from pine 1x8s to fit along the top of the cabinet. Nail the fascia to the cabinet and to the 2×4 nailer attached to the ceiling.
12. Install crown molding along the ceiling and across the newly installed cabinets.
13. Nail the new baseboard across the base of the cabinets.
14. Build a pine-frame toekick to fill the space between two cabinets. Then cut a shelf to fit on top of the toekick. Adhere the shelf with construction adhesive only.
15. Build and install a second pine frame and shelf to create a storage nook between the two cabinets.
16. Scribe the 1×6 pine face frame to fit between the wall and cabinet. Bevel-cut the board along the scribed line with a circular saw.
17. Nail the scribed face frame to the cabinets.
18. Cut and install the remaining face frames to the cabinets.
19. Finish the cabinets with a coat of semigloss acrylic latex paint.
Follow This Old House and Ask This Old House:
Facebook: https://www.facebook.com/ThisOldHouse
Twitter: https://twitter.com/thisoldhouse
https://twitter.com/asktoh
Pinterest: http://www.pinterest.com/thisoldhouse/
G+: https://plus.google.com/+thisoldhouse/posts
Instagram: http://instagram.com/thisoldhouse
Tumblr: http://thisoldhouse.tumblr.com/

The company comply with the contract strict, a very reputable manufacturers, worthy a long-term cooperation.
